Chapter 1. FAST
Chapter Authors & Contributors
- Phil Craven, MD
- Mike Mallin, MD, RDCS, RDMS
- Jonathan Wallace, MD, RDMS
- Adam Guthrie, BKin, MMgmt
1.1 Introduction to #FAST
FAST stands for Focused Abdominal Sonography in Trauma
- The FAST exam was first used in trauma in the 1970s
- FAST is essential in the Advanced Trauma Life Support (ATLS) protocol.
- FAST replaced DPL as the diagnostic modality of choice in evaluating abdominal hemorrhage.
A common occurrence in the Emergency Department is the patient who has trauma that is not readily apparent on the initial physical exam. Further, the presence of distracting injuries, altered mental status, or intoxication may significantly reduce the sensitivity and specificity of physical examination findings.[1] Due to the inadequacies of the physical examination in the trauma patient, further diagnostic studies are indicated in both blunt and penetrating trauma. Obviously, a hypotensive patient with penetrating abdominal trauma requires an emergent exploratory laparotomy (ex-lap); however, a patient with blunt trauma is another matter. In the past, Diagnostic Peritoneal Lavage (DPL) was employed as a method of determining if intra-abdominal bleeding was occurring, and carried a sensitivity of 87-96% for intraperitoneal hemorrhage.[2][3][4] It should be noted that up to one third of trauma patients with a positive DPL will have a negative exploratory laparotomy, as there is a high false positive rate with DPL.[5] As little as 20mL of blood mixed with the standard liter of peritoneal lavage fluid will result in a positive DPL.[6] In addition, DPL may carry a higher false positive rate if pelvic fractures are present due to accidental sampling of a retroperitoneal hematoma. [7][8][9]
In the last 30 years, ultrasound has emerged as an important diagnostic modality in trauma patients. German and Japanese physicians have reportedly been using ultrasound in this setting since the early 1970s[10]; however, it did not gain favor in the United States until the 1980s.[11] Currently, ultrasound and the Focused Assessment with Sonography in Trauma (FAST) exam[12] are employed as part of the Advanced Trauma Life Support (ATLS) protocol developed by the American College of Surgeons.
1.2 FAST Exam
- FAST can be performed in less than 3 mins.
- Views include the RUQ, subxiphoid, LUQ, and pelvic.
- FAST exam can be performed with the curvilinear or phased array probe.
Movie 1.1
FAST How-to
Indications for FAST Exam
FAST is the imaging modality of choice in the ATLS protocol, performed immediately after the primary survey. The purpose of the FAST is to ultrasonographically evaluate the pericardial and peritoneal spaces for the presence or absence of blood. In essence, the FAST exam has replaced the DPL in this role. It is less invasive, safe in pregnancy, and does not carry any of the complications associated with DPL. The FAST exam has a sensitivity range of 73-88% and specificity of 98-100%, depending on the operator.[13][14][15] In the hands of an experienced operator, the specificity approaches 100%. However, because of the range of accuracy, it must be understood that the FAST exam is a screening test that helps determine if the unstable patient has an intra-abdominal injury requiring an emergent exploratory laparotomy. It assesses if there is fluid in the abdomen, most likely blood in the setting of trauma, but the FAST cannot directly assess organs or hollow viscus. This results in the high specificity and slightly lower sensitivity because FAST indirectly evaluates organs and bowel. Ultrasound cannot replace computed tomography (CT), which has much better accuracy with solid organ and bowel injuries. The advantage of the FAST is that it can be reliably performed in fewer than 3 mins,[16] and so it is ideal for decision making during a trauma situation. If a patient is unstable and has a positive FAST, an emergent exploratory laparotomy is required. An unstable patient with a negative FAST should prompt a search for other causes of hypotension.
The FAST exam was initially designed for use in the trauma setting; however, there are other situations in which the FAST exam is useful.
Specific indications for a FAST exam include:
- Blunt and penetrating cardiac trauma: early bedside ultrasound is indicated, and early diagnosis of a pericardial effusion significantly improves mortality in both penetrating[17] and blunt[18] cardiac trauma.
- Blunt abdominal trauma.
- Penetrating abdominal trauma: although the FAST exam was initially designed for blunt abdominal trauma, it appears to be useful in penetrating trauma. FAST has a specificity of 94% and sensitivity of 46% in this setting,[^19] and so it is still helpful in determining management. A positive result is a strong predictor that the patient requires an ex-lap.[19][20] The low sensitivity highlights that ultrasound cannot directly evaluate bowel and organ injury, which are most likely in penetrating trauma.
- Ectopic pregnancy: a FAST exam should be performed on every unstable patient with a possible ectopic pregnancy. Free fluid in the abdomen is highly suggestive of an ectopic. A moderate amount of free pelvic fluid has an 86% likelihood of being from an ectopic, and hepatorenal free fluid carried nearly a 100% risk of ectopic in one study.[21] In fact, free fluid may be the only abnormal sonographic finding in roughly 15% of ectopic pregnancies.[22] In a study of 242 women with suspected ectopic pregnancy, emergency medicine physicians identified 10 patients with fluid in Morison’s pouch on FAST, 9 of which went to the OR. This resulted in a positive likelihood ratio of 112.[23] Performing a FAST exam can significantly reduce the time to diagnosis and treatment of ectopic pregnancy.[24]
- A FAST exam is indicated in any clinical situation in which a clinician is concerned for intra-abdominal free fluid or hemorrhage. This could include liver failure with ascites, a ruptured ovarian cyst, undifferentiated hypotension, etc (Chapter 5. RUSH).
- Ultrasound is indicated in blunt or penetrating chest trauma in order to evaluate for hemo- or pneumothorax. Evaluation of the thorax is part of the Extended FAST (EFAST), and will be further discussed at the end of the chapter (#1.3 Extended FAST (EFAST)).
ANATOMICAL CONSIDERATIONS
The FAST exam is performed with the patient lying supine. In this anatomic position, the hepatorenal space (#Morrisons Pouch), #Splenorenal Recess, and #Pelvis are the most dependent portions of the peritoneal cavity. Any fluid present will most likely accumulate first in Morison’s pouch, with any overflow travelling down the right paracolic gutter into the rectovesicular space in males and recto-uterine space (Pouch of Douglas) in females.[25] Similarly, fluid in the splenorenal recess may overflow and travel down the left paracolic gutter into the pelvis or over to Morison’s pouch. The FAST exam is completed by imaging these three areas of the abdomen for free fluid and obtaining a subcostal view of the heart to evaluate for a pericardial effusion. Fluid will appear as a black stripe within the image. Ultrasound can reliably detect 200mL of fluid in the peritoneum,[26] with some evidence showing that as little as 100mL can be detected depending on the operator.[27] There is some evidence that smaller amounts of fluid can be reliably detected if the patient is placed in the Trendelenburg position.[28]
PROBE SELECTION
Probe Selection: The 3.5MHZ #phasedarray probe can be used, as the transducer can fit into an intercostal space and some feel that images may be more easily obtained without an obscuring rib shadow. A #curvilinear probe may also be used, and will carry its own advantages and disadvantages. The advantage is that a wider and clearer image will be obtained, as well as better tissue penetration, but the likelihood of an obscuring rib shadow is higher.
[[01_probePhased.jpg]] | Phased Array Probe
[[01_probeCurvilinear.jpg]] | Curvilinear Probe
ULTRASOUND VIEWS AND NORMAL/ABNORMAL FINDINGS
The 4 views of the FAST Exam: Morison's Pouch (RUQ), the splenorenal recess (LUQ), the pelvis (suprapubic area), and the pericardium (subxiphoid) (#Gallery 1.1).
Gallery 1.1
Four Views of the FAST Exam
[[01_PosFASTRUQ.jpg]] | Morison's Pouch
[[01_PosFASTLUQ.jpg]] | Splenorenal Recess
[[01_PosSX.jpg]] | Subxiphoid
[[01_PosFASTPelvis.jpg]] | Pelvis
Pericardial View
#SubxiphoidView
The subxiphoid view is obtained by placing the probe just inferior to the xiphoid and directing it towards the patient's head. The probe marker should be aiming towards the patient’s right side. Occasionally, the probe may need to be directed towards the patient’s left shoulder.
The liver is used as the acoustic window for this image, thus the probe may need to be slightly to the right of the patient’s xiphoid. It is important to flatten the probe down so that it is roughly flat on the abdominal wall. To do this, the probe is held with a pincer grasp so that the operator’s hand does not interfere with flattening the probe (#Gallery 1.2).
Gallery 1.2
Pericardial View
[[01_PosSX.jpg]] | Pericardial View
[[01_PosSXOblique.jpeg]] | Pericardial View
[[01_PosSXAngled.jpeg]] | Pericardial View
The resulting image should be a coronal section of the heart in which all 4 chambers are visualized. (#Gallery 1.3)
Gallery 1.3
All Four Chambers
[[01_ScanSX.jpg]] |  Subxiphoid 4 Chamber (S4C)
[[01_ScanSXLabelled.jpg]] |  S4C with labels
Movie 1.2
Normal Subxiphoid View
This view can be used to assess chamber size and global cardiac function; however, the main point of interest is to evaluate the pericardium for evidence of effusion.
A normal pericardium should consist of a single hyperechoic (white) line surrounding the heart (#Movie 1.3). A pericardial effusion is present if fluid accumulates within the potential space between the pericardium and the cardiac muscle. On ultrasound, this will appear as a black (anechoic) stripe (#Movie 1.4).
Movie 1.3
Normal Pericardium
Movie 1.4
Pericardial Effusion
The most feared complication of a pericardial effusion is #tamponade, which may develop depending on the amount of fluid and rate of accumulation (#Movie 1.5 and #Movie 1.6). Effusions may be acute or chronic, but must be assumed acute in the setting of trauma and hypotension. A small amount of fluid (50-100cc) may cause tamponade if it accumulates rapidly enough.[29] Recall that tamponade physiology occurs if the pressure in the pericardial sac exceeds the right atrial or ventricular filling pressures. If this occurs, the cardiac chambers are unable to fill, and so ejection fraction and cardiac output are reduced. Clinically this is manifested as JVD, tachycardia, hypotension, muffled heart sounds, etc. There are specific findings on ultrasound, such as right atrium or right ventricular collapse, indicative of tamponade physiology (Chapter 2. Basic Cardiac). However, this assessment can be challenging.
Movie 1.5
Tamponade with RA Collapse
Movie 1.6
Tamponade with RV Collapse
In the trauma setting, if a patient is hemodynamically unstable and has a pericardial effusion on ultrasound, the patient must be presumed to have cardiac tamponade until proven otherwise.
Morrisons Pouch #RUQView
The probe is placed at the mid-axillary line between the 8th and 11th ribs. The probe should be placed in an oblique angle, such that it will fit into an intercostal space, with the probe marker pointing cephalad towards the posterior right axilla. The resulting image should include the liver and right kidney interface and superior kidney and diaphragm interface (#Gallery 1.4).
Gallery 1.4
RUQ view
[[01_PosFASTRUQ.jpg]] | Probe is placed at level of liver in posterior-axillary line with probe marker towards patient's head.
[[01_PosRUQLevelToBed.jpg]] | Probe should be a finger's breadth above the surface of the bed.
[[01_PosRUQRibAngled.jpg]] | Rotate the probe into an oblique angle, such that it will fit into an intercostal space, with the marker pointing caudally & towards the posterior right axilla.
[[01_ScanRUQ.jpg]] | An ideal view demonstrates the diaphragm (left surface of liver) and the hepatorenal interface (right surface) without any rib shadows.
The point of interest in this image (#Gallery 1.5) is the interface between the liver-kidney and between the liver-diaphragm. The liver and kidney interface represents Morison’s Pouch. Morison’s Pouch is a potential space, and so on a normal FAST exam, it should not contain any fluid. If fluid were to accumulate within Morison’s Pouch, a black stripe would be visualized, appearing to separate the interface between the liver and kidney. The length (in cm) of the anechoic stripe in Morison’s Pouch may correlate with the volume of fluid within the peritoneum. A 0.5cm stripe corresponds with roughly 500cc fluid.10 A 1.0cm stripe correlates with 1000cc fluid.[30] Gallery 1.5, image 3, shows roughly 500-1000cc fluid in Morison’s Pouch. A positive FAST can also occur if there is fluid above the liver and under the diaphragm. In the following image (Gallery 1.5), the liver and hyperechoic diaphragm can be seen with a thin stripe of black fluid separating the two (#Movie 1.7).
Gallery 1.5
RUQ View
[[01_ScanRUQlabelled.jpg]] | The liver and kidney interface represents Morison's Pouch.
[[01_ScanRUQFFMorison.jpg]] | If fluid were to accumulate within Morison's Pouch. a black stripe would be visualized, appearing to seperate the interface between the liver and kidney.
[[01_ScanRUQFFMorison2.jpg]] | Roughly 500-1000cc fluid in Morison's pouch.
Movie 1.7
Black Stripe Representing Fluid Within Morison’s Pouch
Splenorenal Recess #LUQView
This view is often the most difficult view to obtain during the FAST exam. In the RUQ view, the liver acts as a large acoustic window. In the LUQ, the spleen is much smaller and so provides a smaller window. The spleen is a very posterior structure, thus the best approach to obtain a view is to place the probe at the posterior axillary line. This is often described as the operator placing their knuckles on the bed, implying a more posterior approach. In this fashion the stomach is avoided and the posterior spleen is used as an acoustic window to view the kidney. The next step is to lower the sensing end of the probe down until it comes into contact with the patient (#Gallery 1.6).
Gallery 1.6
Obtaining LUQ View
[[01_PosLUQ1.jpg]] | To obtain the LUQ window the operator should start with the hand on the bed.
[[01_PosLUQ2.jpg]] | The probe can be lowered with the tail of the probe touching the bed.
[[01_PosLUQ3.jpg]] | The probe shold contact the posterior axillary line.
[[01_PosLUQ4.jpg]] | Slight clockwise rotation will allow visualization without rib shadows.
The result is that the transducer will come into contact with the patient at the posterior axillary line, at the 6th-9th rib interspaces. The probe may be rotated slightly clockwise so that the probe fits obliquely within a rib interspace.
In this position, the probe will be lined up through the spleen and kidney to obtain the necessary image. Once properly aligned, the ultrasound view should contain diaphragm, spleen and left kidney. If these are not visible, the probe should be kept in the same alignment, and with the scanning hand still touching the gurney, move the probe caudally up 1-2 rib interspaces or have the patient inspire. The anatomy of a normal LUQ view will appear as follows (#Image 1.1).
Image 1.1
Normal RUQ View
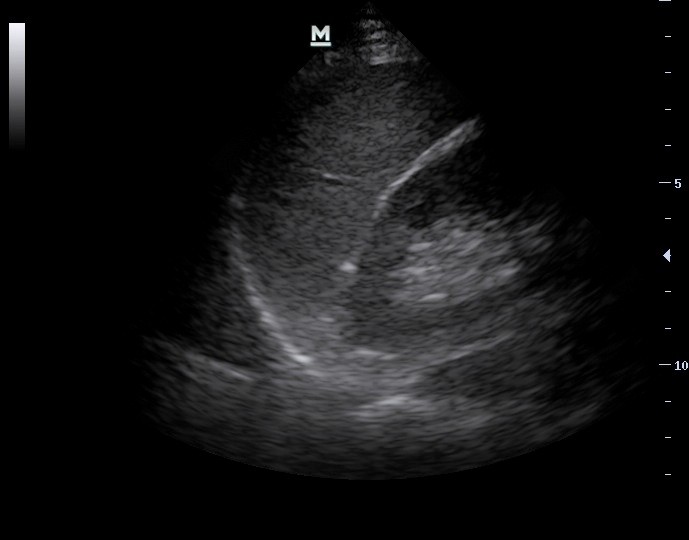
The point of interest in the LUQ is the area surrounding the spleen. Fluid may accumulate between the spleen and kidney or between the spleen and diaphragm. In the normal FAST (#Movie 1.8), the spleen-renal and spleen-diaphragm interfaces will both be flush without an anechoic stripe. If fluid is present, the interfaces will be widened, and a black stripe of fluid will separate the spleen and kidney or the spleen and diaphragm (#Gallery 1.7 and #Movie 1.9).
Movie 1.8
Normal FAST (LUQ)
Gallery 1.7
LUQ View
[[01_ScanLUQlabelled.jpg]] | In the normal FAST, the spleen-renal and spleen-diaphragm interfaces will both be flush without an anechoic stripe.
[[01_ScanLUQFFsplenorenal.jpg]] |  If fluid is present, the interfaces will be widened, and a black stripe of fluid will separate the spleen and kidney or the spleen and diaphragm
Movie 1.9
Positive LUQ View
Pelvic Views
Typically this view is the easiest to obtain in the FAST, and will evaluate for fluid in the pelvis. Imaging the pelvis is different from the other views of the FAST in that the pelvis is imaged in 2 different planes. To obtain the longitudinal view, the probe is placed 2cm superior to the symphysis pubis, at midline, with the probe marker pointing towards the patient’s head (#Gallery 1.8). Notice that the prostate is at the caudal end of the bladder (#Gallery 1.9 and #Movie 1.10). The prostate is an extra-peritoneal organ, and so its location demarcates the end of the inferior peritoneum.
Gallery 1.8
Pelvic View
[[01_PosPelvisM1.jpg]] | The probe is placed 2cm superior to the symphysis pubis, at midline, with the probe marker pointing towards the patient’s head.
[[01_PosPelvisM2.jpg]] | The probe is placed 2cm superior to the symphysis pubis, at midline, with the probe marker pointing towards the patient’s head.
[[01_PosFASTPelvis.jpg]] | The probe is placed 2cm superior to the symphysis pubis, at midline, with the probe marker pointing towards the patient’s head.
Note the orientation of the probe marker is to the patient's head.
Gallery 1.9
Male Anatomy - Sagittal
[[01_ScanPelvisM.jpg]] | Male Anatomy - Sagittal
[[01_ScanPelvisMLabelled.jpg]] | Male Anatomy - Sagittal
Movie 1.10
Male Anatomy - Sagittal
In the male, free fluid will collect posterior and superior to the bladder in the rectovesicular space. Because the prostate demarcates the inferior peritoneum, fluid will accumulate superior to it and the bladder. In the following, (#Movie 1.11) note that the black peritoneal fluid begins at the superior bladder and tracks down to the prostate.
Movie 1.11
Positive Male Pelvic View
To obtain the transverse view, the probe marker is simply turned 90º counterclockwise and oriented toward the patient’s right (#Gallery 1.10).
One pitfall with imaging in the transverse plane in the male is that the sonographer may angle the probe too far caudally (towards the feet) and image the bladder and prostate. As the prostate is an extra-peritoneal organ, the peritoneum is not being imaged, and so the probe must be angled more cranially in order to assess for intraperitoneal fluid.
Gallery 1.10
Male Transverse Pelvic View
[[01_PosPelvisMTx.jpg]] | To obtain the transverse view, the probe marker is simply turned 90º counterclockwise and oriented toward the patient’s right
[[01_PosPelvisMTx2.jpg]] | To obtain the transverse view, the probe marker is simply turned 90º counterclockwise and oriented toward the patient’s right
[[01_ScanPelvisMTx.jpg]] | Male anatomy in the transverse view.
[[01_ScanPelvisMTxLabelled.jpg]] | Male anatomy in the transverse view.
Note the orientation of the probe marker is to the patient's right side.
In the following video, note that the bladder and prostate are imaged initially, and the probe is then rocked cranially so that the prostate is no longer seen and the rectovesicular space behind the bladder can be imaged (#Movie 1.12).
Movie 1.12
Normal Male Pelvic View
In the female (#Gallery 1.11), the uterus will be visible on the pelvic view of the FAST. The probe is placed in the same suprapubic position as described above, with the uterus visualized on the resulting image.
Gallery 1.11
Female Pelvic View
[[01_PosPelvisF.jpg]] | Female Pelvic View
[[01_ScanPelvisF.jpg]] | Female Pelvic View
[[01_ScanPelvisFLablled.jpg]] | Female Pelvic View
In the female, the most dependent portion of the peritoneum is the Pouch of Douglas (rectouterine pouch), and so fluid is most likely to accumulate there.[25:1] In the resulting longitudinal video, the bladder can be seen at the top of the image, with the uterus posterior and cephalad (#Movie 1.13).
Movie 1.13
Longitudinal View of Female Pelvis
The following videos show fluid anterior and posterior to the uterus in the Pouch of Douglas. The anechoic area anterior to the uterus represents a pocket of pelvic free fluid. The bladder can be visualized to the right of the screen and is incompletely seen (#Movie 1.14 and #Movie 1.15).
Movie 1.14
Positive Female Longitudinal Pelvic View
Movie 1.15
Positive Female Longitudinal View
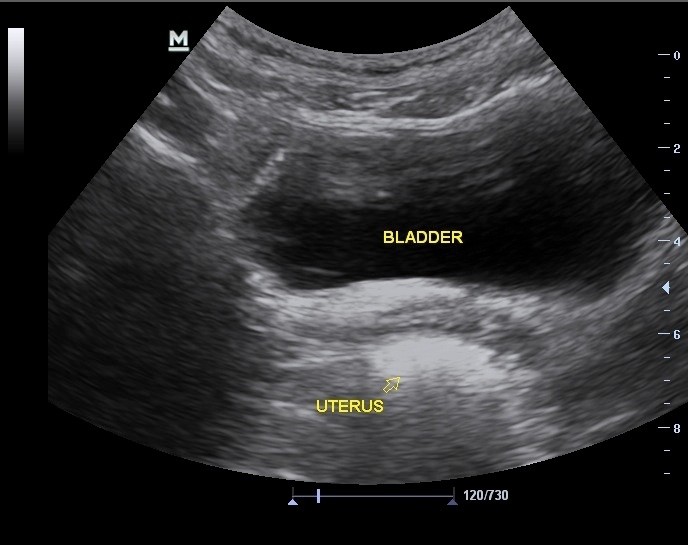
Again, the probe is turned 90° counterclockwise so that the probe marker is facing towards the patient’s right side. This view will show transverse cuts of the bladder and uterus (#Image 1.2). Note that in the transverse plane, the uterus may appear hyperechoic (#Movie 1.16). Here, free pelvic fluid is seen in transverse orientation (#Movie 1.17).
Image 1.2
Normal Transverse Female Pelvic View
Movie 1.16
Normal Female Transverse Pelvic View
Movie 1.17
Positive Female Transverse Pelvic View
1.3 Extended FAST (EFAST)
- The extended fast includes evaluation of the hemithoraces.
- The linear probe is used to evaluate for "lung sliding" and pneumothorax.
- Directing the abdominal probe cranially from the RUQ and LUQ windows allows for evaluation for pleural fluid/ hemothorax.
In recent years, the extended FAST exam has gained favor in the trauma bay. In addition to the traditional FAST views, the EFAST also images the hemithoraces for pneumo- or hemothorax. In the past, the trauma survey relied on physical exam findings and portable chest radiography (PCXR) to detect these. As discussed previously, physical exam findings are unreliable and breath sounds can often be difficult to auscultate while in a busy trauma bay. For pneumothorax, PCXR carries a sensitivity of 48.8-75.5% and specificity of 100%, whereas ultrasound is 92-98.1% sensitive and 99.4% specific.[31][32][33] In addition, bedside ultrasound has the advantage of a speedier diagnosis time of 2.9 minutes versus 19.9 for PCXR.[34]
Ultrasound imaging of the pleural-diaphragmatic interface has been shown to be superior to PCXR in detection of hemothorax or pleural effusion. An upright chest x-ray can detect up to a minimum of 50- 100mL pleural fluid.35 However, a supine chest x-ray, which is typically done in the trauma bay, requires much more fluid accumulation before radiographic changes are seen. A pleural fluid amount of 175mL is required before blunting of the costophrenic angle will be seen on supine PCXR.[35][36][37] Supine ultrasonography of the pleural spaces can detect as little as 20mL of pleural fluid.[38] Ultrasound is more sensitive than PXCR for hemothorax. See Chapter 4. Lung.
ULTRASOUND VIEWS AND NORMAL/ABNORMAL FINDINGS
Pneumothorax
Evaluation for #pneumothorax relies on imaging of the sliding between the visceral and parietal pleura. In a patient without pneumothorax, these two layers will be in direct contact with each other. With respiration, sliding of these two layers can be seen on ultrasound. To perform this examination, a high frequency linear probe is typically used. However, a curvilinear or phased array probe may also be used. The biggest pitfall with this examination is having the image depth set too deep. Unless the patient is extremely obese, a maximum image depth of 4cm should be used. With the patient in the supine position, the probe is placed in the longitudinal position in the 3rd to 4th intercostal space at the midclavicular line on the right and the anterior axillary line on the left. The probe marker should be facing towards the patients head. In this orientation, the ribs and rib shadows can be used as a landmark to find the pleura. The operator should then slide the probe longitudinally until one rib is seen on either side of the image. Immediately posterior to the ribs will be the pleural line (#Gallery 1.12).
In real time, and with normal respirations, the physiologic sliding between the pleura can be visualized. It appears as though it is shimmering and is sometimes referred to as ants marching (#Movie 1.18).
The motion of this sliding artifact is the most common normal sign on ultrasound. Normal lung sliding means that there is no air between the pleura and so excludes pneumothorax.[39][40] Ultrasound M-mode can also be applied and will show a characteristic pattern in that granular artifacts will be seen below the bright pleural line. This is termed the seashore sign and represents normal pleural sliding.
Gallery 1.12
EFAST Thoracic Ultrasound
[[01_PosPleuraRight.jpg]] | The probe is placed in the longitudinal position in the 3rd to 4th intercostal space.
[[01_PosPleuraLeft.jpg]] | The probe is placed in the longitudinal position in the 3rd to 4th intercostal space.
[[01_ScanPleuraNormal.jpg]] | The normal anatomy on ultrasound.
[[01_ScanPleura.jpg]] | The normal anatomy on ultrasound.
[[01_ScanPleuraLabelled.jpg]] | Immediately posterior to the ribs will be the pleural line.
[[01_ScanPleuraMLabelled.jpg.png]] | Ultrasound M-mode will show a characteristic pattern in that granular artifacts will be seen below the bright pleural line.
Movie 1.18
Normal Sliding Lung
Another sign of a normally functioning lung is the comet tail artifact, or B-line. This is a type of reverberation artifact that arises from distended water-filled interlobular septae under the visceral pleura. As the comet tail is caused by visualization of structures deep to the visceral pleura, they may only be seen if no pneumothorax is present. Comet tail artifact may not always be present, but carries a sensitivity of 100% for ruling out pneumothorax when seen.[41] The following video shows comet tail artifacts intermittently with respirations (#Movie 1.19).
Movie 1.19
Comet Tail Artifacts
If a pneumothorax is present, then no lung sliding will be visualized (#Movie 1.20 and #Movie 1.21). As discussed above, the absence of lung sliding is 99.4% specific for pneumothorax.[31:1][32:1][33:1]
Movie 1.20
Pneumothorax
Movie 1.21
Pneumothorax
A pneumothorax will show a characteristic appearance on M-mode resulting from reverberation artifact of the ultrasound waves between the pleura and air. Parallel horizontal lines will be seen throughout the image that represents pneumothorax and is called the barcode sign or stratosphere sign (#Gallery 1.13).
The #lungpoint can be used to estimate the size of a pneumothorax. The lung point is the transition between expanded and collapsed lung. The lung point can be difficult to find; however, when present, it is 100% specific for pneumothorax.[42] The lung point is the specific point at which the shimmering or ants marching will cease and no pleural sliding will be seen thereafter. In #Gallery 1.14, comet tails and sliding artifact can be seen; however, a point is seen thereafter in which there are no comet tails.
Gallery 1.13
Pneumothorax
[[01_ScanPleuraPTXM.jpg]] | Barcode sign or stratosphere sign.
[[01_ScanPleuraLungPoint.jpg]] | Comet tails and sliding artifact can be seen; however, a point is seen thereafter in which there are no comet tails.
Hemothorax
Evaluation for #hemothorax uses the same probe and probe position as when assessing Morison’s Pouch and the splenorenal recess. Essentially, the normal FAST view of the LUQ and RUQ are obtained then the probe is slid 1-2 rib interspaces up, or simply angled cephalad. In this position, the hyperechoic diaphragm can be seen to overly either the spleen or liver (#Gallery 1.14).
Gallery 1.14
Evaluating for Hemothorax
[[01_PosHTXRight.jpg]] | In this position, the hyperechoic diaphragm can be seen to overlay either the spleen or liver.
[[01_PosHTXLeft.jpg]] | In this position, the hyperechoic diaphragm can be seen to overlay either the spleen or liver.
[[01_PosHTXSubcostal.jpg]] | Some authors suggest using an anterior, subcostal approach, using the liver as an acoustic window into the hemithorax.
Some authors suggest using an anterior, subcostal approach, using the liver as an acoustic window into the hemothorax. The presence of fluid in the pleural space can be seen as black fluid superior to diaphragm (#Movie 1.22 and #Movie 1.23).
Movie 1.22
Presence of Fluid
Movie 1.23
Presence of Fluid
Movie 1.24
One Minute Ultrasound EFAST Demo
1.4 Summary
In summary, ultrasound has become a reliable and important tool in evaluating the patient with thoracoabdominal trauma. The FAST and EFAST can easily be performed at the bedside and dramatically decrease time to diagnosis and length of stay in the emergency department. These exams can also be used in any non-trauma situation when there is suspected pneumothorax, pleural, pericardial, or peritoneal fluid.
1.5 References
Schurink GW, Bode PJ, van Luijt PA, et al. The value of physical examination in the diagnosis of patients with blunt abdominal trauma: a retrospective study. Injury. 1997 May;28(4):261-5. ↩︎
Henneman PL, Marx JA, Moore EE, et al. Diagnostic peritoneal lavage: accuracy in predicting necessary laparotomy following blunt and penetrating trauma. The Journal of Trauma. 1990;30(11):1345-55. ↩︎
Meyer DM, Thal ER, Weigelt JA, et al. Evaluation of computed tomography and diagnostic peritoneal lavage in blunt abdominal trauma. The Journal of Trauma. 1989; 29(8):1168-70;discussion 1170-2. ↩︎
Day AC, Rankin N, Charlesworth P. Diagnostic peritoneal lavage: integration with clinical information to improve diagnostic performance. Journal of Trauma and Acute Care Surger. 1992;32(1):52-7. ↩︎
Bilge A, Sahin M. Diagnostic peritoneal lavage in blunt abdominal trauma. Eur J Surg 1991;157:449–451. ↩︎
Tintinalli JE, Gabor DK, Stapczynski JS. Emergency Medicine: A comprehensive study guide. 6th Edition. New York (NY): The McGraw-Hill Company; 2011:1874. ↩︎
Mendez C, Gubler KD, Maier RV. Diagnostic accuracy of peritoneal lavage in patients with pelvic fractures. Arch Surg. 1994;129:477–482. ↩︎
Hubbard SG, Bivins BA, Sachatello CR, et al. Diagnostic errors with peritoneal lavage in patients with pelvic fractures. Arch Surg 1979;114:844–846. ↩︎
Bivins BA, Sachatello CR, Daughtery ME, et al. Diagnostic peritoneal lavage is superior to clinical evaluation in blunt abdominal trauma. Am Surg 1978;44:637–641. ↩︎
Tiling T, Bouillon B, Schmid A. Ultrasound in blunt abdominothoracic trauma. in: Border J, Allgoewer M, Hansen S (eds.), Blunt Multiple Trauma: Comprehensive Pathophysiology and Care. New York: Marcel Dekker; 1990:415-433. ↩︎
Jehle D, Davis E, Evans T, et al. Emergency department sonography by emergency physicians. Am J Emerg Med. 1989;7(6):605-11. ↩︎
Scalea TM, Rodriguez A, Chiu WC, et al. Focused Assessment with Sonography for Trauma (FAST): results from an international consensus conference. J Trauma. 1999;46(3):466-72. ↩︎
Healey MA, Simons RK, Winchell RJ, et al. A prospective evaluation of abdominal ultrasound in blunt trauma: Is it useful? J Trauma 1996;40:875–883. ↩︎
Boulanger BR, Brenneman FD, McLellan BA, et al. A prospective study of emergent abdominal sonography after blunt trauma. J Trauma 1995;39:325–330. ↩︎
McKenney MG, Martin L, Lentz K, et al. 1000 consecutive ultrasounds for blunt abdominal trauma. J Trauma 1996;40:607–612. ↩︎
Boulanger BR, McLellan BA, Brenneman FD, et al. Emergent abdominal sonography as a screening test in a new diagnostic algorithm for blunt trauma. J Trauma 1996;40:867–874. ↩︎
Plummer D, Brunette D, Asinger R, et al. Emergency department echocardiography improves outcome in penetrating cardiac injury. Ann Emerg Med 1992;21:709-12. ↩︎
Schiavone WA, Ghumrawi BK, Catalano DR, et al. The use of echocardiography in the emergency management of nonpenetrating traumatic cardiac rupture. Ann Emerg Med 1991;20:1248-50. ↩︎
Boulanger BR, Kearney PA, Tsuei B, et al. The routine use of sonography in penetrating torso injury is beneficial. J Trauma 2001;51:320-5. ↩︎
Tayal VS, Beatty MA, Marx JA, et al. FAST (Focused Assessment With Sonography in Trauma) Accurate for Cardiac and Intraperitoneal Injury in Penetrating Anterior Chest Trauma. J Ultrasound Med 2004;23(4):467-472. ↩︎
Mahony BS, Filly RA, Nyberg DA, et al. Sonographic evaluation of ectopic pregnancy. J Ultrasound Med 1985;4:221-228. ↩︎
Nyberg DA, Hughes MP, Mack LA, et al. Extrauterine findings of ectopic pregnancy of transvaginal US: Importance of echogenic fluid. Radiology 1991;178:823-826. ↩︎
Moore C, Todd WM, O'Brien E, et al. Free fluid in Morison's pouch on bedside ultrasound predicts need for operative intervention in suspected ectopic pregnancy. Acad Emerg Med. 2007;14(8):755-8. ↩︎
Rodgerson JD, Heegaard WG, Plummer D, et al. Emergency department right upper quadrant ultrasound is associated with a reduced time to diagnosis and treatment of ruptured ectopic pregnancies. Acad Emerg Med 2001;8:331-336. ↩︎
Meyers MA. The spread and localization of acute intraperitoneal effusion. Radiology 1970;94:547-554. ↩︎ ↩︎
Branney SW, Wolfe RE, Moore EE, et al. Quantitative sensitivity of ultrasound in detecting free intraperitoneal fluid. J Trauma 1995;39:375–380. ↩︎
Kimura A, Otsuka T. Emergency center ultrasonography in the evaluation of hemoperitoneum: a prospective study. J Trauma 1991;31:20-23. ↩︎
Abrams BJ, et al. Ultrasound for the detection of intraperitoneal fluid: the role of Trendelenburg positioning. Am J Emerg Med. 1999;17(2):117-20. ↩︎
Otto, CM. Textbook of Clinical Echocardiography. 4th edition. Philadelphia, PA: Saunders Elsevier; 2009. ↩︎
Boschert, S. Clinical and Practice Management: Use ultrasound to quickly detect bleeding in the belly. ACEP News, Nov. 2007. Available at http://www.acep.org/content.aspx?id=34000. Accessed June 15, 2012. ↩︎
Blaivas M, Lyon M, Duggal S. A prospective comparison of supine chest radiography and bedside ultrasound for the diagnosis of traumatic pneumothorax. Acad Emerg Med. 2005;12(9):844-849. ↩︎ ↩︎
Soldati G, Testa A, Sher S, et al. Occult traumatic pneumothorax: diagnostic accuracy of lung ultrasonography in the emergency department. Chest. 2008;133(1):204-211. ↩︎ ↩︎
Kirkpatrick AW, Sirois M, Laupland KB, et al. Hand-held thoracic sonography for detecting post-traumatic pneumothoraces: the Extended Focused Assessment with Sonography for Trauma (EFAST). J Trauma. 2004;57(2):288-95. ↩︎ ↩︎
Zhang M, Liu ZH, Yang JX, et al. Rapid detection of pneumothorax by ultrasonograpy in patients with multiple trauma. Crit Care. 2006;10(4):R112. ↩︎
Rubens MB. The pleura: collapse and consolidation. In: Sutton D ed. A textbook of radiology imaging. 4th ed. Edinburgh: Churchill Livingstone; 1987:393. ↩︎
Woodring JH. Recognition of pleural effusion on supine radiographs: how much fluid is required? AJR Am J Roentgenol. 1984;142(1):59-64. ↩︎
Juhl JH. Disease of the pleura, mediastinum, and diaphragm. In: Juhl JH, Crummy AB eds. Essentials of radiologic imaging. 6th ed. Philadelphia, PA: JB Lippincott Company; 1993:1026. ↩︎
Rothlin MA, Naf R, Amgwerd M, et al. Ultrasound in blunt abdominal and thoracic trauma. J Trauma 1993;34:488-95. ↩︎
Kirkpatrick AW, Nicolaou S. The sonographic detection of pneumothoraces. In: Kharmy-Jones R, Nathens A, Stern E, eds. Thoracic Trauma and Critical Care. Boston, MA: Kluwer Academic Publishers; 2002:227-234. ↩︎
Lichtenstein DA. Pneumothorax and introduction to ultrasound signs in the lung. In: General Ultrasound in the Critically Ill. 1st ed. Berlin: Springer; 2002:105-115. ↩︎
Lichtenstein D, Mezière G, Biderman P, et al. The comet-tail artifact: an ultrasound sign ruling out pneumothorax. Intensive Care Med. 1999;25(4):383-8. ↩︎
Lichtenstein D., et al. The "lung point": an ultrasound sign specific to pneumothorax. Intensive Care Med. 2000;26:1434-40. ↩︎